Menu
Your Cart

5A DC DC Adjustable Buck Digital Control Power Supply Constant Voltage Constant Current Color Screen High Precision Support Modbus

5A DC DC Adjustable Buck Digital Control Power Supply Constant Voltage Constant Current Color Screen High Precision Support Modbus
$31.40
Ex Tax: $31.40
  • Stock: In Stock
  • Model: EB003134
  • SKU: EB003134

Available Options

Description:

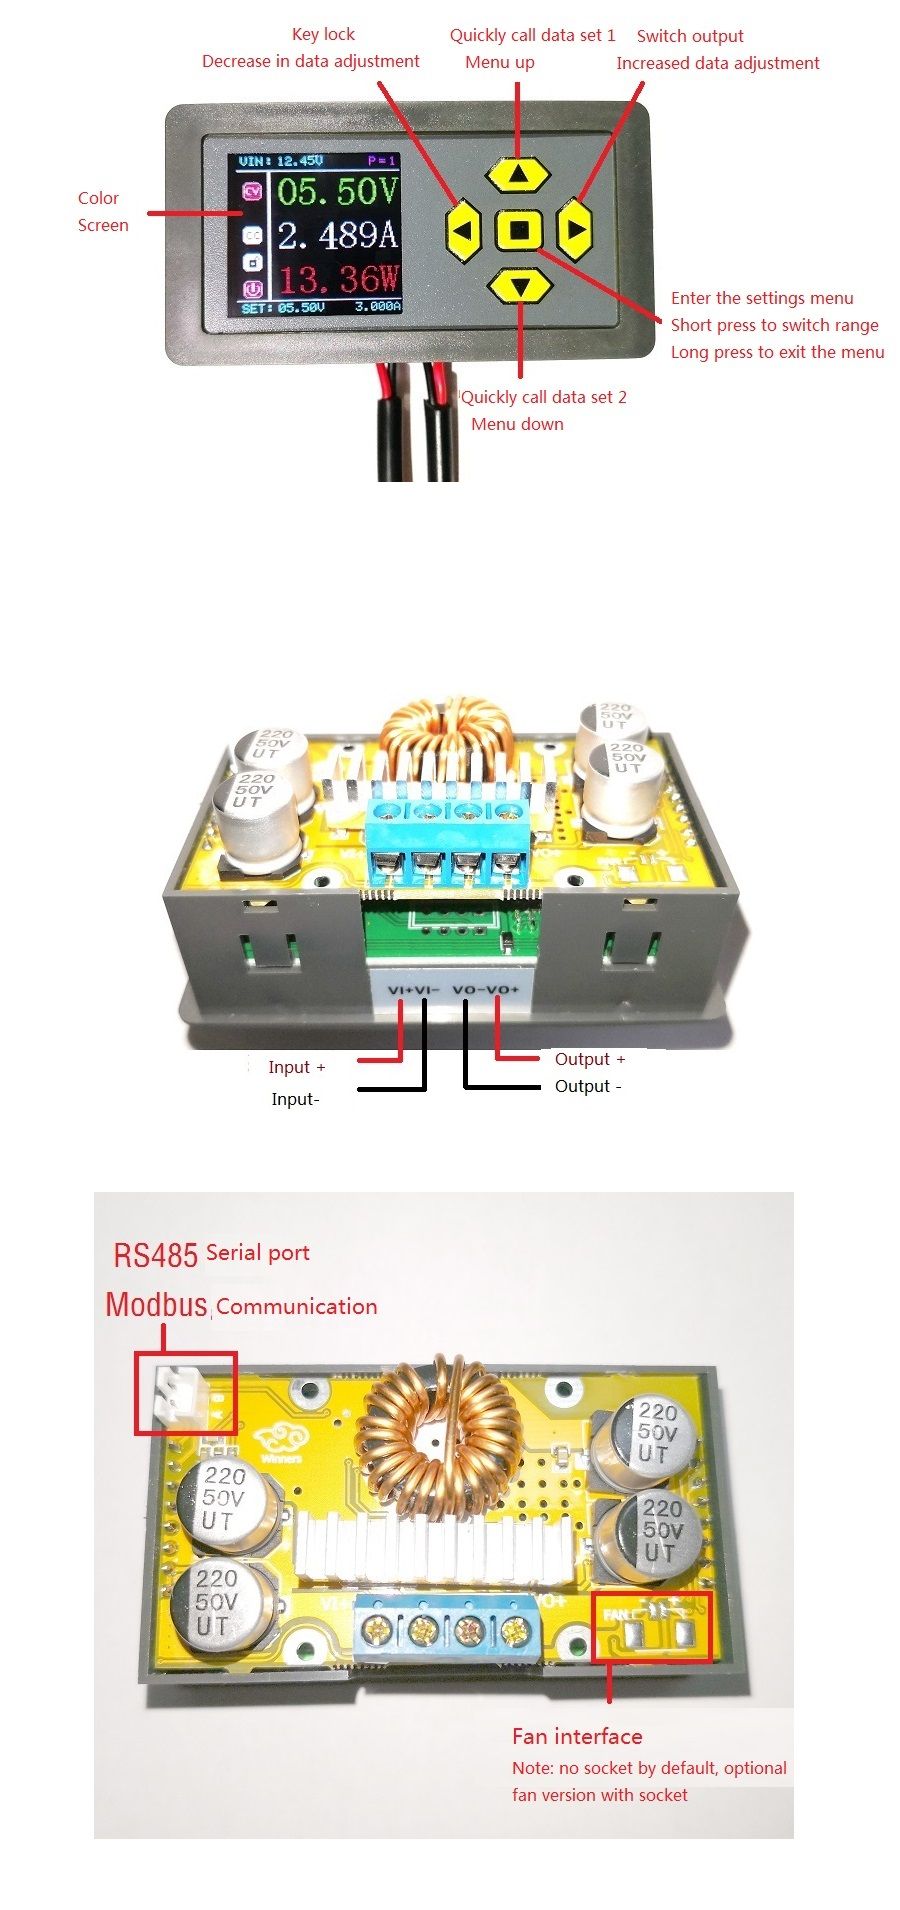
Versions Notes: This CNC power supply is divided into two versions, CNC color screen version and version with MODBUS function. The difference is that the MODBUS version of the power supply has RS485 communication interface, which can be set or collected by the host computer software, or with the PLC. DCS, smart meters and other devices for communication! Other than that, the other features are the same!


Product parameters:
 
Input voltage: 6V-35V
Output voltage: 0-32V continuously adjustable (can only be used as a buck module, the input must be greater than the output 1V or more)
Output current: 0A-5A continuously adjustable (enhance heat dissipation when the temperature exceeds 60 degrees, reserve fan installation position and terminal block)
Output power: up to 160W (recommended to use within 120W, please reduce power when using large differential pressure)
Working temperature: -10~+75 degrees (pay attention to the power tube temperature when using, please strengthen the heat dissipation, reserve the fan installation position and terminal block)
Resolution: voltage 0.01V, current 0.001A
Accuracy: voltage 0.01V ± 1 word, current 0.001A ± 2 words
Conversion efficiency: up to 95%
Short circuit protection: Yes, constant current value currently set by constant current
Input anti-reverse: Yes
Output backflow: none
Wiring method: terminal VI+ is input positive, VO+ is output positive
Module size: length 79mm width 43mm height 46mm
Opening size: length 76mm width 39mm
Weight: 75g

Setting instructions:
 
Output voltage setting: Short press the “middle square” button to enter the setup menu interface. Press the “Up” or “down” button to select the setting item up and down, locate the “V-SET” item, and press the “left and right arrow keys”. ”Adjust the current value and press the “middle square button” to switch the coarse adjustment of the range. After the adjustment, press and hold the “middle square” button for 2 seconds to save and exit.
 
Output current setting: Short press the “middle square” button to enter the setup menu interface. Press the “up” or “down” button to select the setting item up and down, locate the “I-SET” item, and press the “direction arrow left and right button”. ”Adjust the current value and press the “middle square button” to switch the coarse adjustment of the range. After the adjustment, press and hold the “middle square” button for 2 seconds to save and exit. (Note that CC status indication will be converted to white on red background when constant current is constant! Constant current adjustable current, it must be constant current mode when the actual load output current is greater than the set current, otherwise it will work in constant voltage state, not current adjustment To 2A, it means that any device will change to 2A)
 
Overvoltage setting: Short press the “middle square” button to enter the setup menu interface. Press the “up” or “down” button to select the setting item up and down, locate the “S-OVP” item, and press the “left and right arrow keys”. ”Adjust the current value and press the “middle square button” to switch the coarse adjustment of the range. After the adjustment, press and hold the “middle square” button for 2 seconds to save and exit. (When the input voltage exceeds the set value, the output is automatically turned off)
 
Over power setting: Short press the “middle square” button to enter the setting menu interface. Press the “up” or “down” button to select the setting item up and down, locate the “S-OPP” item, and press the “direction arrow left and right button”. ”Adjust the current value and press the “middle square button” to switch the coarse adjustment of the range. After the adjustment, press and hold the “middle square” button for 2 seconds to save and exit. (When the output power exceeds the set value, the output is automatically turned off)
 
Brightness setting: Short press the “middle square” button to enter the setting menu interface. Press the “up” or “down” button to select the setting item up and down, locate the “S-LED” item, and press the “direction key left and right”. Adjust the current value. After adjusting, press and hold the “middle square” button for 2 seconds to save and exit. (Brightness is adjustable from 0-9 levels)
 
Power-on output switch setting: short press the “middle square” button to enter the setup menu interface. Press the “up” or “down direction” button to select the setting item up and down, locate the “P-[1]” item, and press “ Left and right keys of the arrow keys to adjust the current value. After the adjustment, press and hold the “middle square” button for 2 seconds to save and exit. (When set to OFF, the output is off when switching to the current data set. When set to ON, the output is turned on when switching to the current data set)
 
Quick data group setting: Short press the “middle square” button to enter the setting menu interface. Press the “up” or “down” button to select the setting item up and down, locate the “P-ARRA” item, and press the “direction key”. Left and right keys adjust the current value. After adjusting, press and hold the “middle square” button for 2 seconds to save and exit. (You can set 10 different data groups, each group can set different values. In the main interface, you can directly press the “direction” or “down” button to quickly call the P1 and P2 CNC groups. Other groups need to be in Set menu call)
 
Switch output setting: In the main interface, directly press “Direct Right” to turn the output voltage on or off. When it is off, the voltage, current and power will display 0.
 
Key lock setting: In the main interface, short press “Direct Left” to open or close the key lock function. When locked, all other buttons are invalid.

>>Place Click here to download the software<<

Package Includes:

1 x CNC power supply

Details Pictures:


5A-DC-DC-Adjustable-Buck-Digital-Control-Power-Supply-Constant-Voltage-Constant-Current-Color-Screen-1596739

Write a review

Note: HTML is not translated!
Bad Good

Shipping Time


After you successfully placed an order at RenhotecIC.com, you will receive a confirmation email with your invoice. Once your order is shipped, you will be emailed with the tracking information of your package. Also, you can choose your preferred shipping method during the checkout process. Kindly advise: please select DHL/FedEx if you need our product urgently.

The timeline of the whole shipping process is shown below:

img

The total delivery time is calculated from the time your order is successfully placed to the time received. Total delivery time is broken down into processing time and shipping time.

Processing time: The time it takes to prepare your item(s), includes preparing your items, performing quality inspections, and packaging for shipment. Normally, the processing time is 1-3 days (Only include Monday to Saturday ) after getting your order.

Shipping time: The time for your item(s) to travel from our warehouse to your destination. The shipping time depends on the shipping method you chose. Please refer to the shipping rate section for details. 


Shipping Rates


You could choose the shipping method based on your preference during checkout, different shipping methods will apply different rates and shipping times. Please check the following chart for detail:


Shipping MethodShipping RatesShipping Times
Flat Shipping (Promotion)
$10About 5-30 Working Days to Worldwide (Only include Monday to Saturday )

Standard Express(0.5KG starting price listed)

Based On WeightsAbout 5-15 Working Days to Worldwide (Only include Monday to Saturday )

Priority Express (0.5KG starting price listed)

Based On WeightsAbout 3-7 Working Days to Worldwide (Only include Monday to Saturday )

In addition, the transit time depends on where you're located, the shipping method you choose, and where your package comes from. We will keep you informed of any problems here to help you get your order as soon as possible. 

If you want to know more information, please contact the customer service by contact form or sales@renhotecic.com. We will settle your problem as soon as possible. Enjoy shopping!